Follow Lilach
Stop chasing content: an easier way to manage clients and save time
If you have a digital agency, work as part of a marketing team or work with clients directly in any way (no matter the industry!), then you know that one of the biggest challenges is getting and managing client content in a timely, efficient way.
Usually, the process goes a little something like this:
- You send your clients a bunch of emails requesting content or files
- You wait, you follow up – and with a bit of luck, your clients will start sending you the content in question
- Send even more emails when your clients aren’t sending you the exact content that you wanted (it could be a word doc, a series of images or videos you need for a campaign, and so on)
- Dig frantically through countless email threads to find what you need
And then, of course, there’s the issue of storing and finding your documents and content when needed – when you use email, Google Docs, and other platforms, that can get a bit complicated.
And well, it’s unnecessarily complicated: there are much easier ways to handle all of these client communications and automate the process, which will ultimately save you and your team hours of work every week.
This is in fact, one of the aspects of my business that eats up most of my time: email. I spend hours every day responding to and managing email and it’s a huge waste of time. And once I realized that, I started looking for tools that could help me eliminate the use of email and make client communication easier and more effective.
That’s where Content Snare comes in: a powerful, easy-to-use software tool and client portal that allows you to automate the process of collecting content and files from your clients, without having to use email.
That means no more endless email threads, no more large email attachments – or transfers via WeTransfer and other similar platforms – and no more impossible-to-find Google Docs.
All of your client content and files will be conveniently stored in one place and all of your content requests will happen in the most efficient and productive way (I’ll show you how in a minute.) You can tell this tool was built by an agency – they clearly know exactly how agencies struggle with these issues.
So, if you want to stop chasing content from clients and become more productive as a team, discover an easier way to manage your clients and save time:
What is Content Snare and how does it work?
Content Snare is a tool that aims to help you become more productive and more profitable, by:
- Allowing you to simplify and even automate the process of requesting content and files from your clients
- Saving you time and removing emails and attachments from the equation (and increasing your profitability in the process as well)
- Helping you ensure your projects run smoothly (it’s so easy to get a project delayed by days and even weeks at a time because you don’t have the content or files you need) – not to mention, with a lot of creative agencies, clients can change their minds at any given moment, which makes the process more time-consuming and more expensive for you. With Content Snare, you can develop a standardized, easy-to-follow creative brief template which will be of massive help to ensure the client provides all the information needed from the start (and that they consider every element from the beginning, avoiding all the back-and-forth that usually ensues when clients realize they need more work done or more changes)
- Making it easier for your clients too: Content Snare lets you send easy-to-understand requests, as I’ll show you in a few minutes – plus, it makes your agency look much more professional in the process!
As I mentioned earlier, Content Snare is particularly useful for agencies, who tend to work with a lot of different clients on various projects and therefore, run into this issue a lot: not getting the content and information you need on time and
So, how exactly does it work? How easy is it to set up and start using?
Getting started with ContentSnare
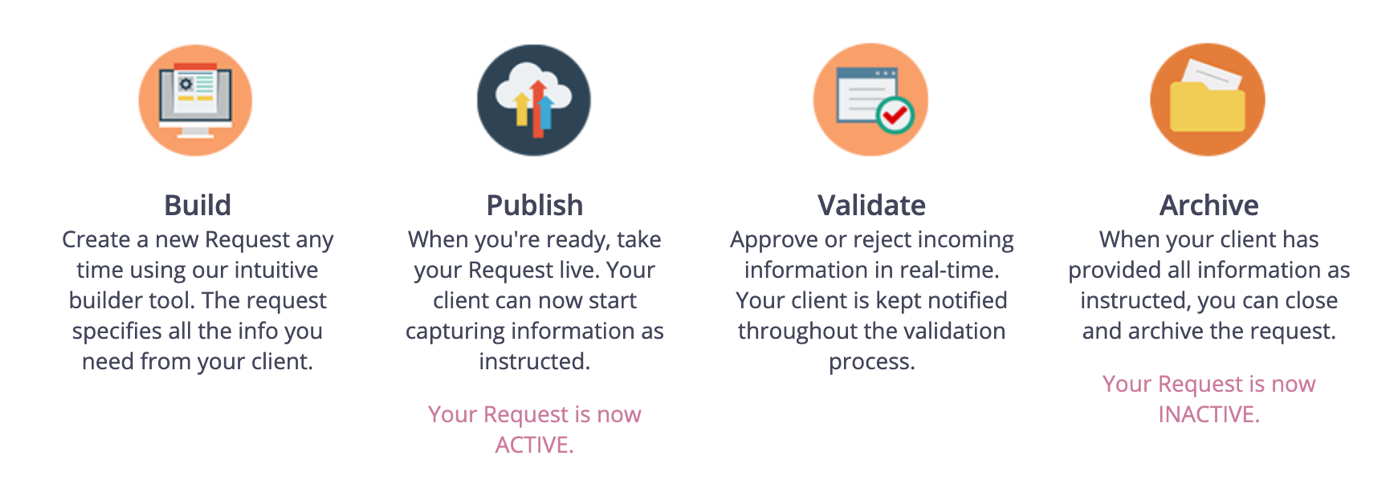
You can get started with Content Snare immediately, out-of-the-box. This is what the process looks like, at a glance:
During the initial set-up process, you can add other team members to your account, to help you manage the process and share tasks.
And once you’ve set all this up, you’re ready to start sending your content/file requests. Simply go to the Requests dashboard and click on Create a New Request:
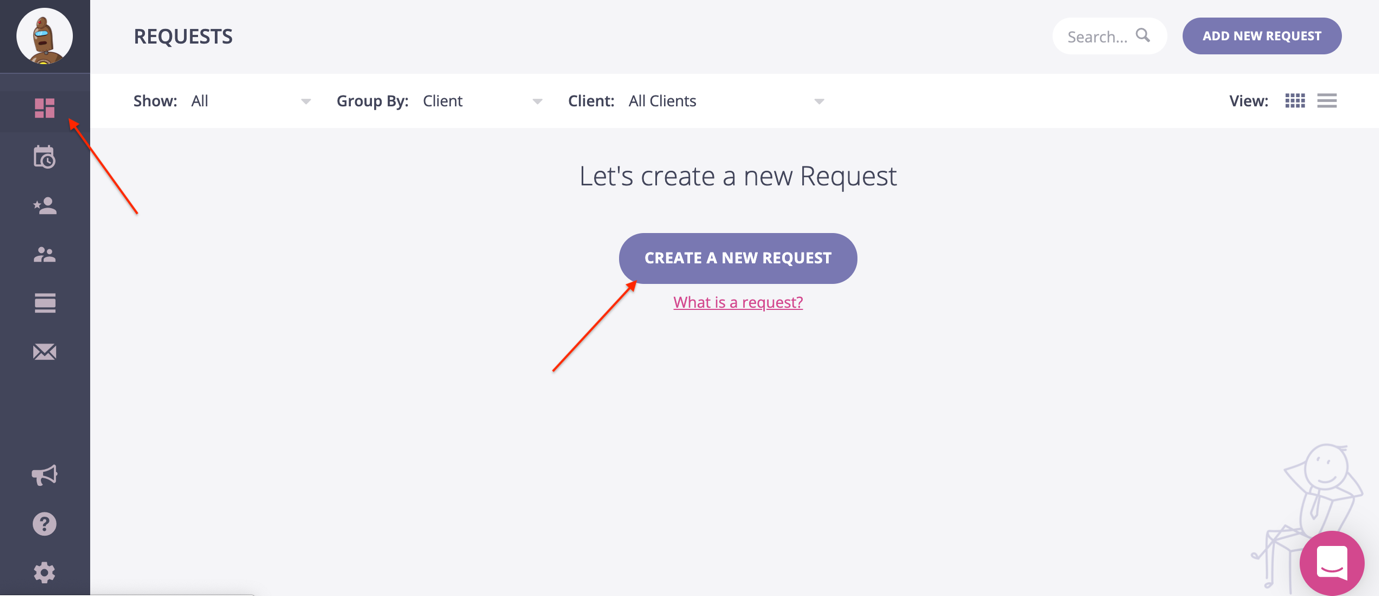
At this stage, you’ll also be able to easily set up clients – i.e. their name, contact information and other relevant information about your clients.
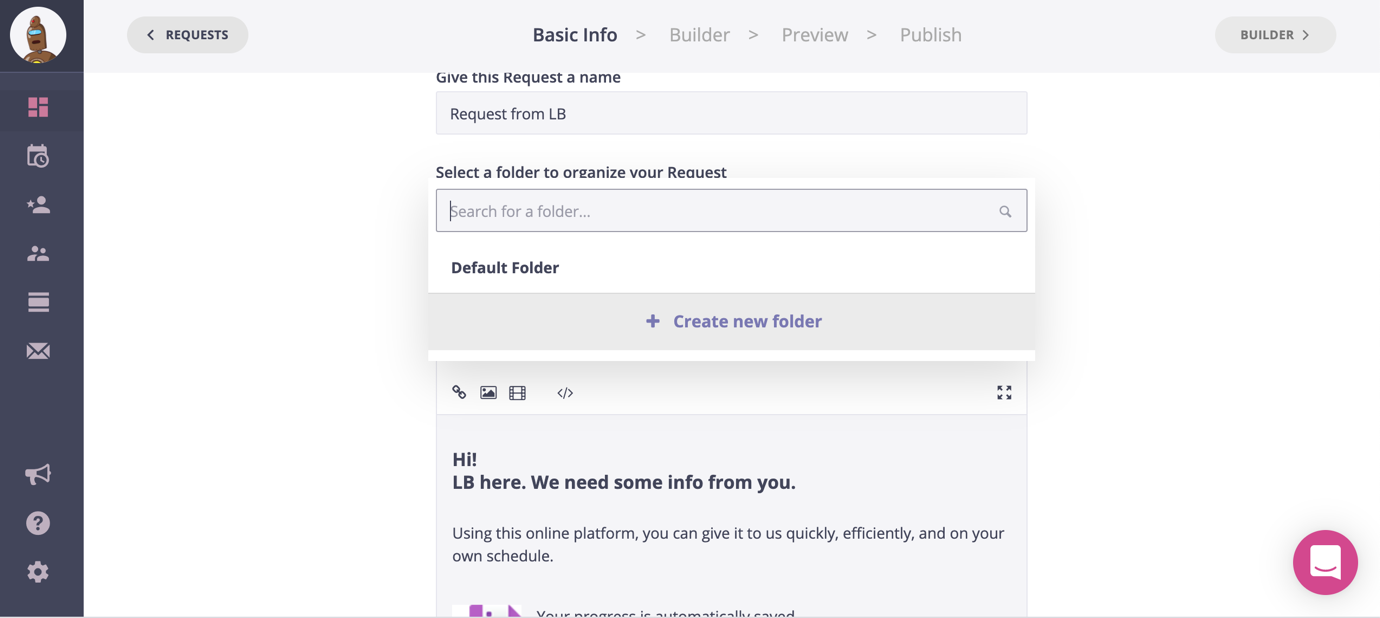
Give your Request a name and place it in a folder for safe keeping – you can create folders directly in the request set-up (otherwise, they’ll just be saved in the Default folder):
If you enable the “request instructions” module, you’ll be able to send a message to your clients explaining exactly what the process is like and what they need to do; this is automatically generated (using icons too, to pretty it up), although you can always customize this message as you want, by changing the formatting, adding images and links, as well as even adding videos:
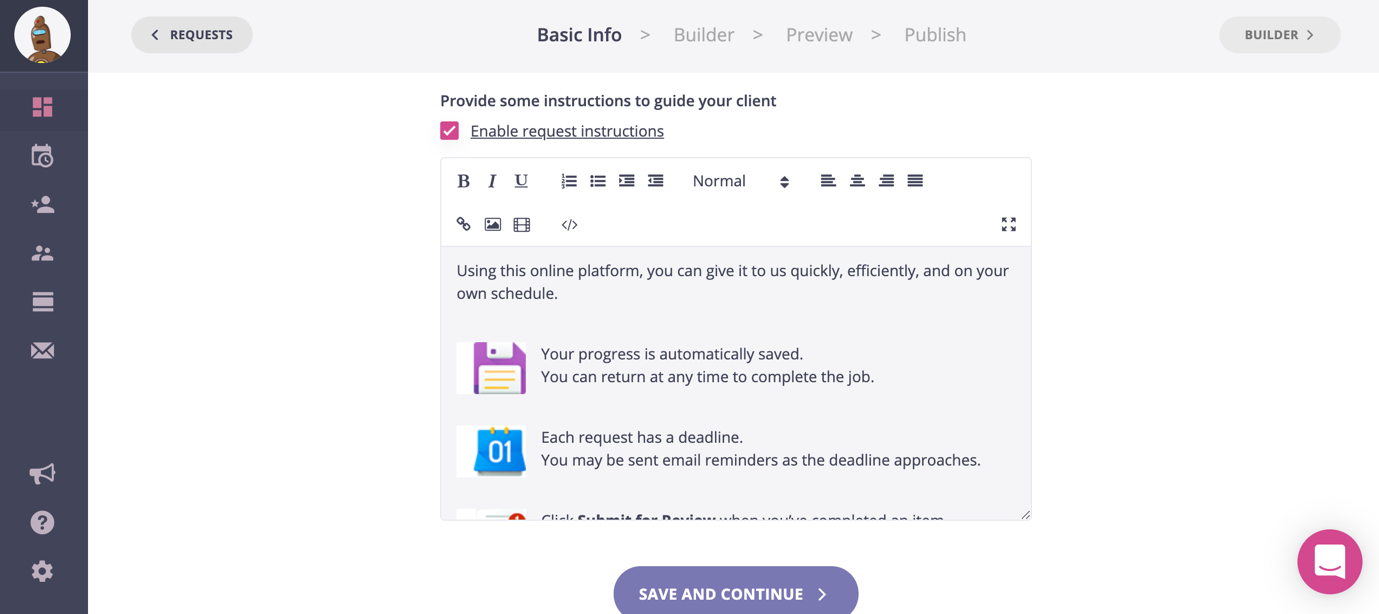
This way, you’re making things very clear for your customers and they’ll know exactly what they need to do. Plus, it looks much more professional.
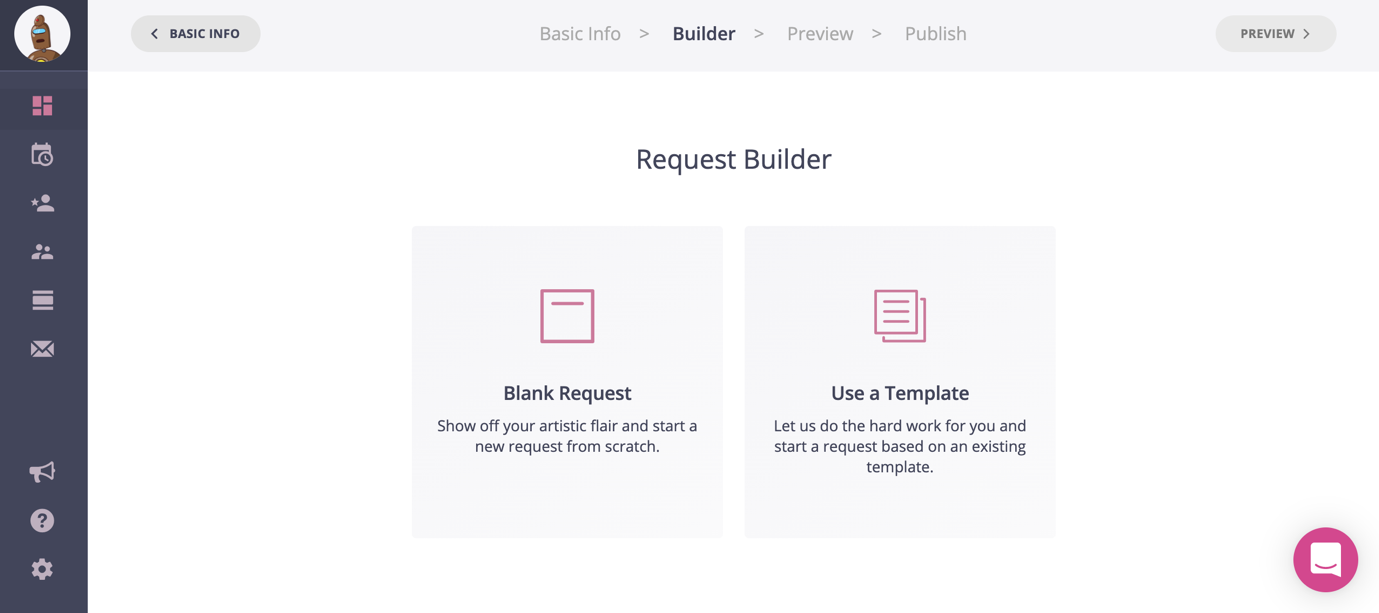
Once you’ve saved all of these settings and the request instructions, you’re taken the Request builder; you can choose whether you want to start from scratch with a blank request or you can use one of their customizable pre-made templates, to help save more time:
You’ll be able to preview the template first to see whether it has what you need:
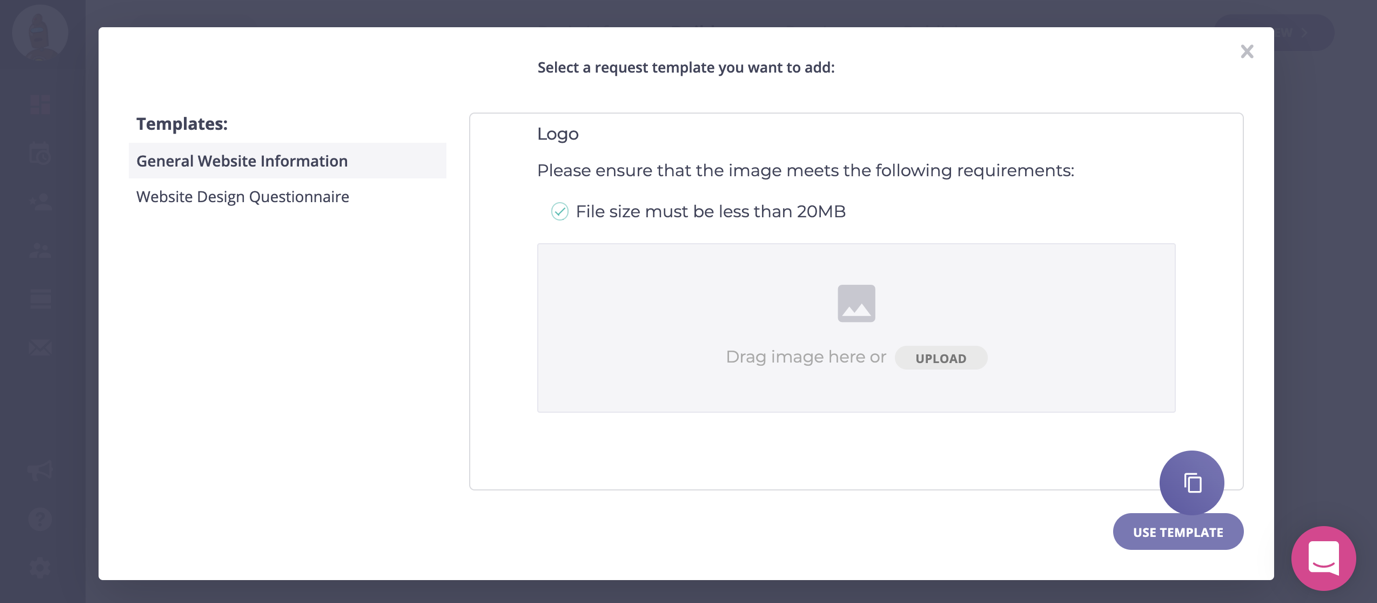
And later on, once you’ve created a Request, you’ll also be able to save your requests as templates and re-use them every time you need them.
Then, it’s simply a question of customizing your request to include all the pieces of information, as well as content and files that you need from your client; plus, you can provide them with other useful templates and questionnaires to help speed up the process and ensure they’re giving you all the information you need; for example:
- Creative brief templates
- Web design questionnaires
- Logo design questionnaires
You can easily drag-and-drop each block used in your Request, as well as change the wording for it:
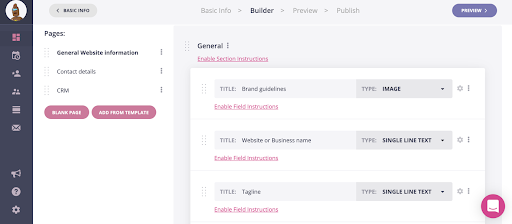
Here, I can:
- Change the title for each block
- Change the content type (for example, I need brand guidelines from a client – so I’ll mark it as a file, so it’s very clear):
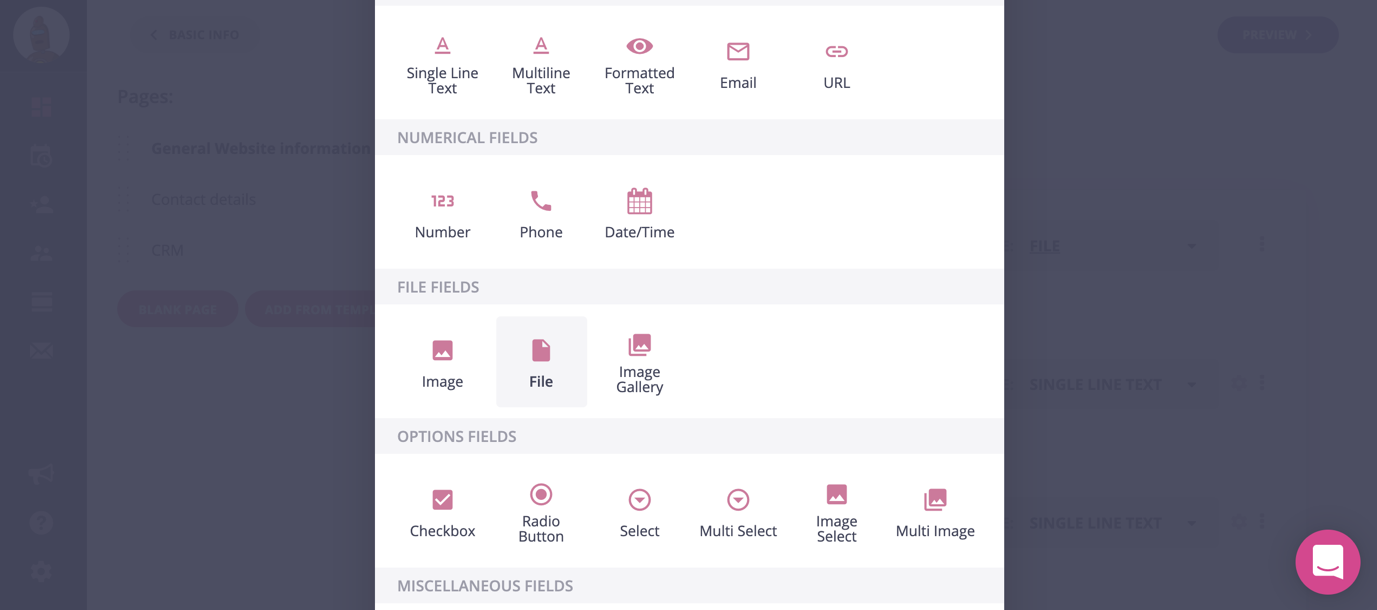
- Add text fields, numerical fields, option fields (like checkbox, image select, multi images and so on, as you can see in the above screenshot)
- Enable field instructions for any block in your request to provide more information for your client
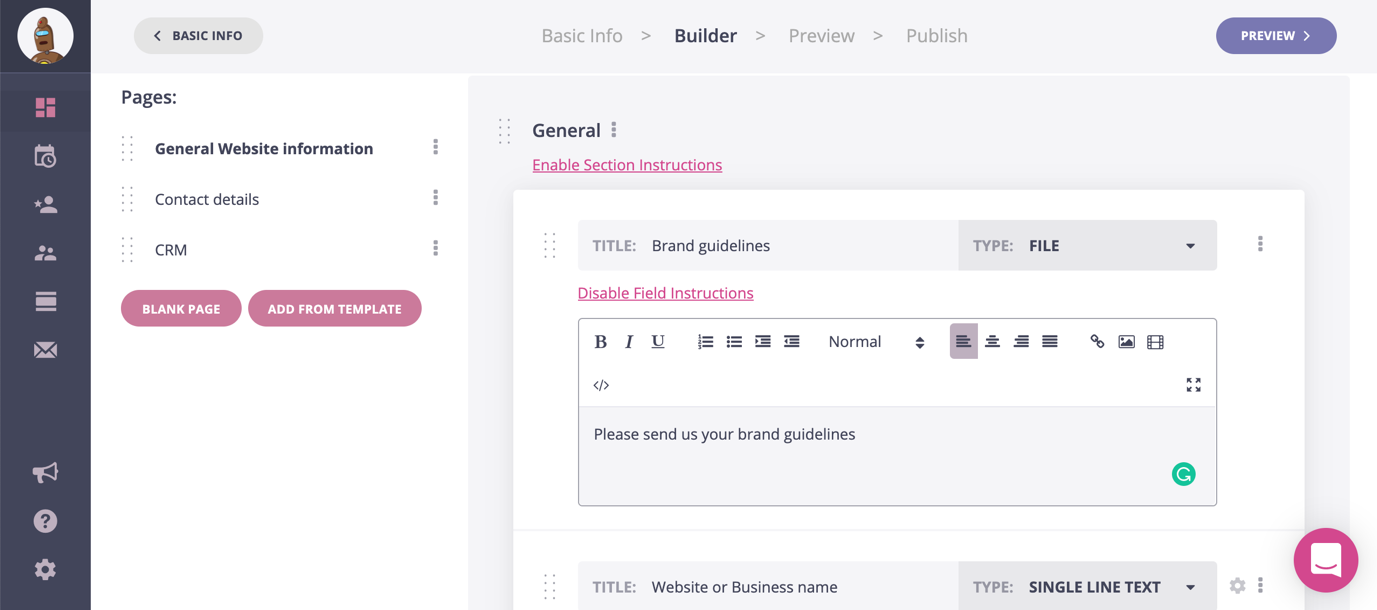
- Enable section instructions to provide additional overall instructions for the entire Request
- Add new pages to your Request, as needed, either using a blank page or adding from a template
Once you’ve finished customizing your Request, you’ll be able to preview each page and see exactly what your clients will see:
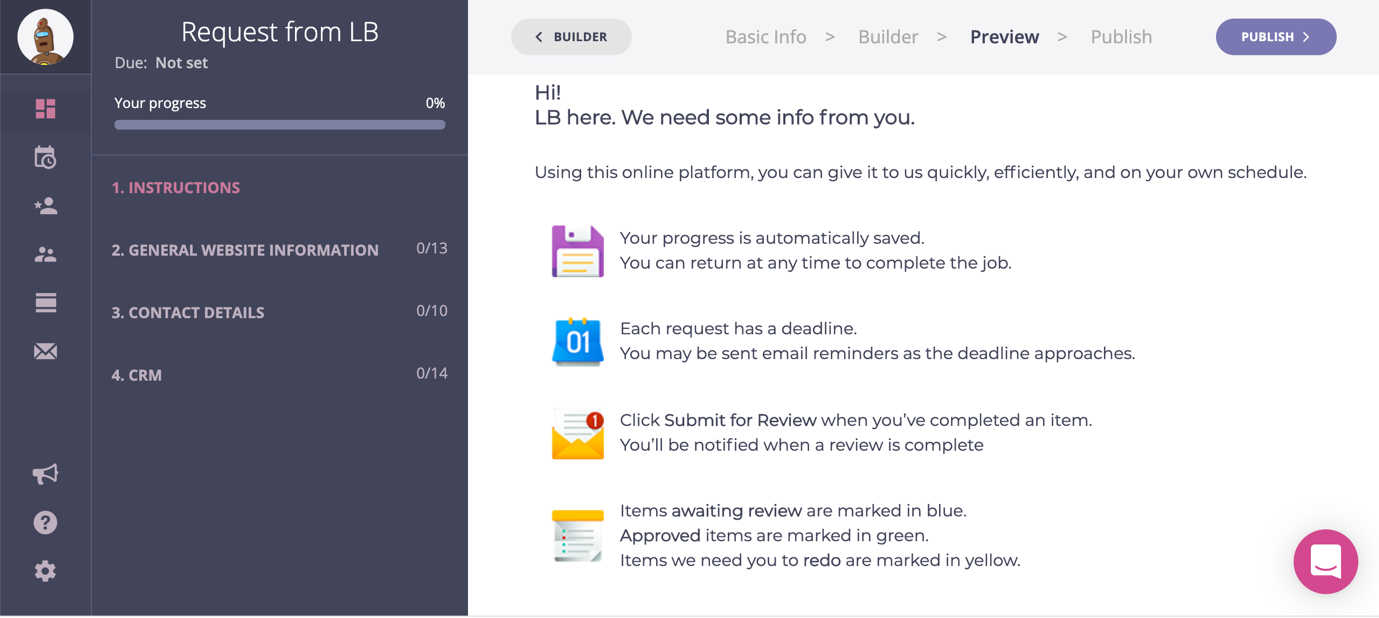
Simply click on each section of your Request from the menu on the left-hand side of the screen to preview each page and ensure everything is correct and easy to understand.
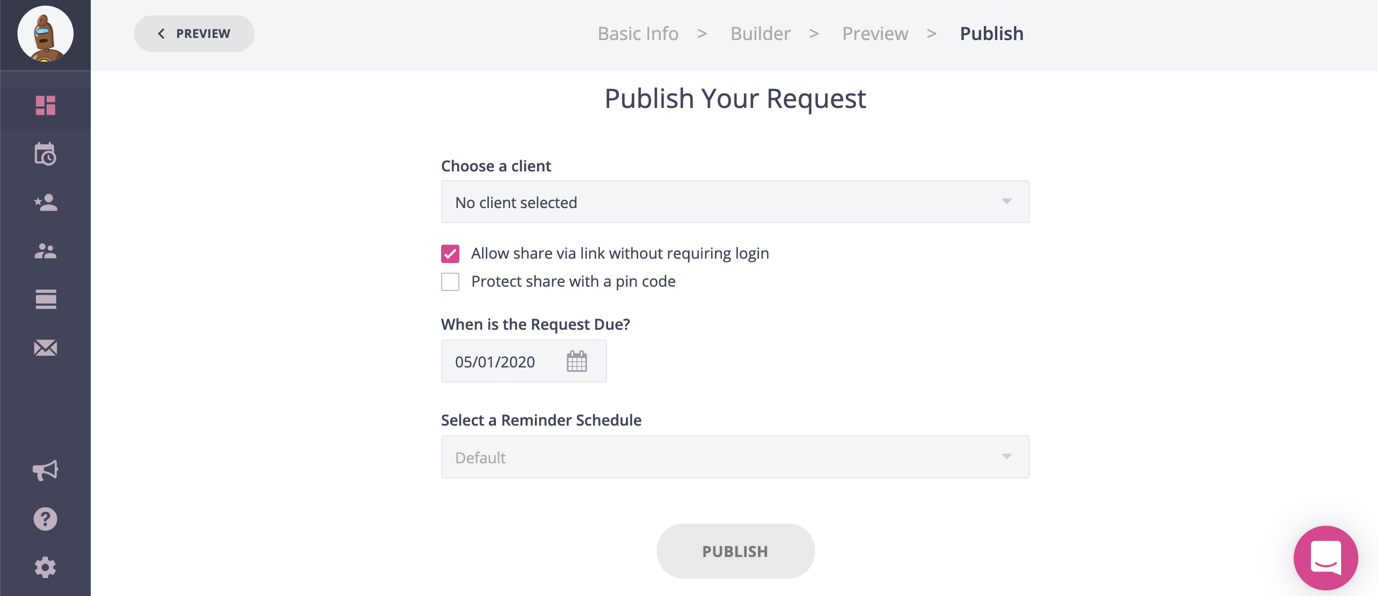
Then, once you’re happy with your request, you can move on to Publish; here, you can:
- Choose the client you’ll need to send this to
- Allow sharing via link, without requiring logins
- Protect your Request and ask for a pin code to access it
- Set a due date for your Request
- Select a Reminder Schedule
- Or simply save and leave your Request as a draft and get back to it a later date
You also have multiple reminder schedule options to help you manage the process more effectively; here’s what it looks like (I’ll show you can customize this and create new reminder schedules in a few):
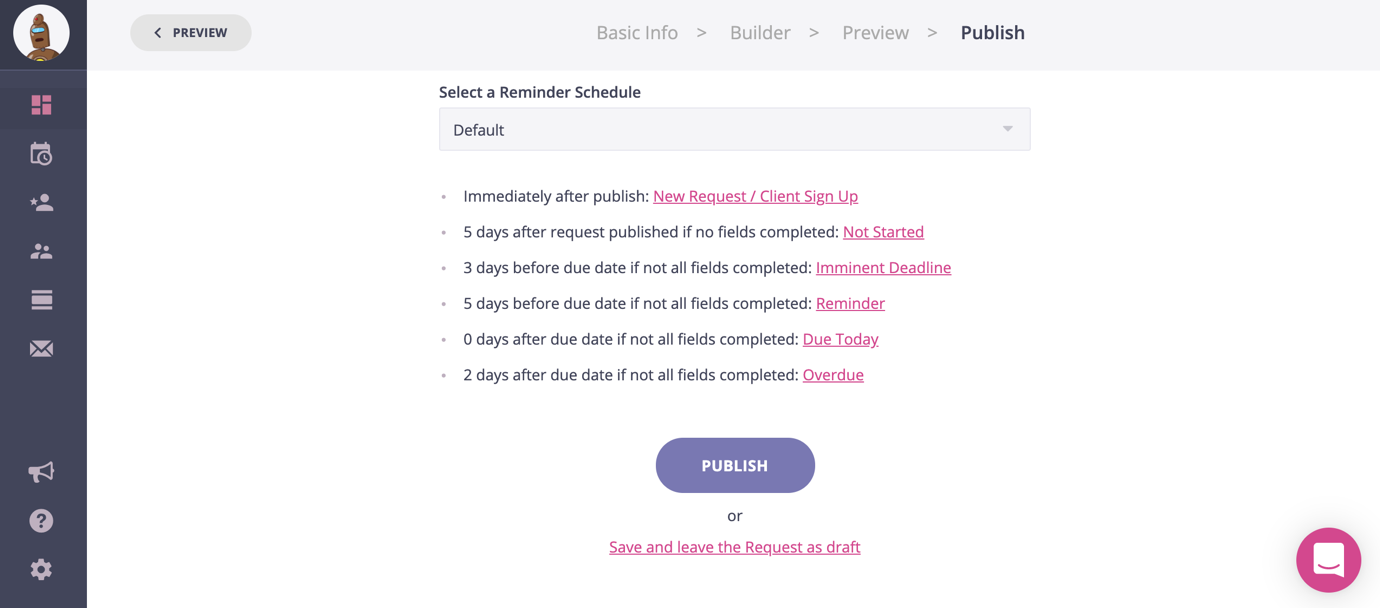
For each of these options, simply click on the highlighted part to see what each email looks like (these are the standard emails that are already set up – you can create your own schedule and set up different emails as well, in the Reminders menu):
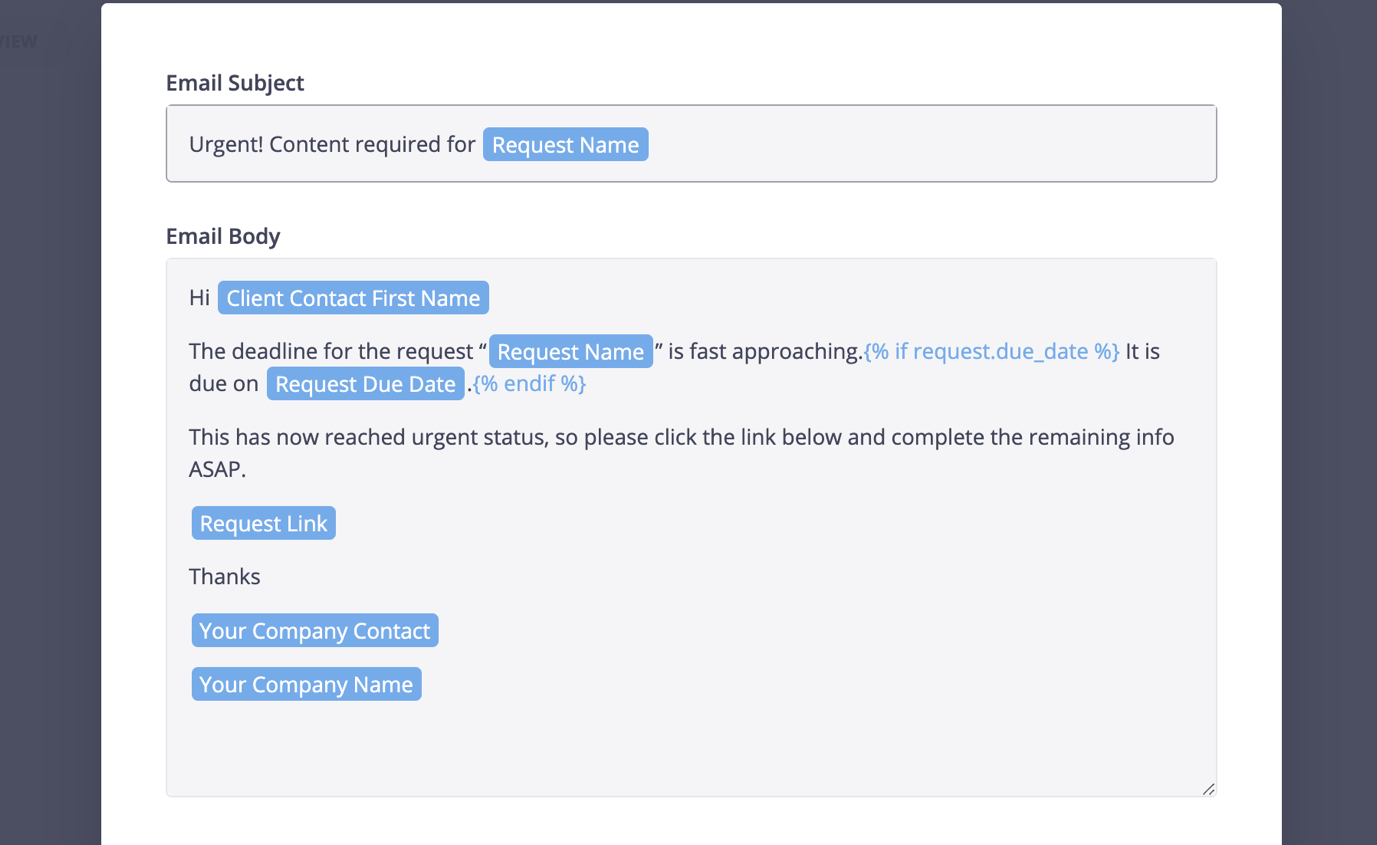
As you can see above, the emails are fully customized with names and dates, in order to make them personalized.
But the best part is – as anyone who works in an agency I’m sure will approve! – is that by automating the process this way, it will save you so many headaches. You won’t need to keep track of every step of the process all the time, constantly check to see whether your clients made the deadline or not, or have to send them dozens of emails to get them to send you the information and files you need on time.
Once your requests are ready, they’ll be easily accessible from your main dashboard, where you’ll also be able to make edits, and see whether the client has completed the steps, and how many to-do’s they have left:
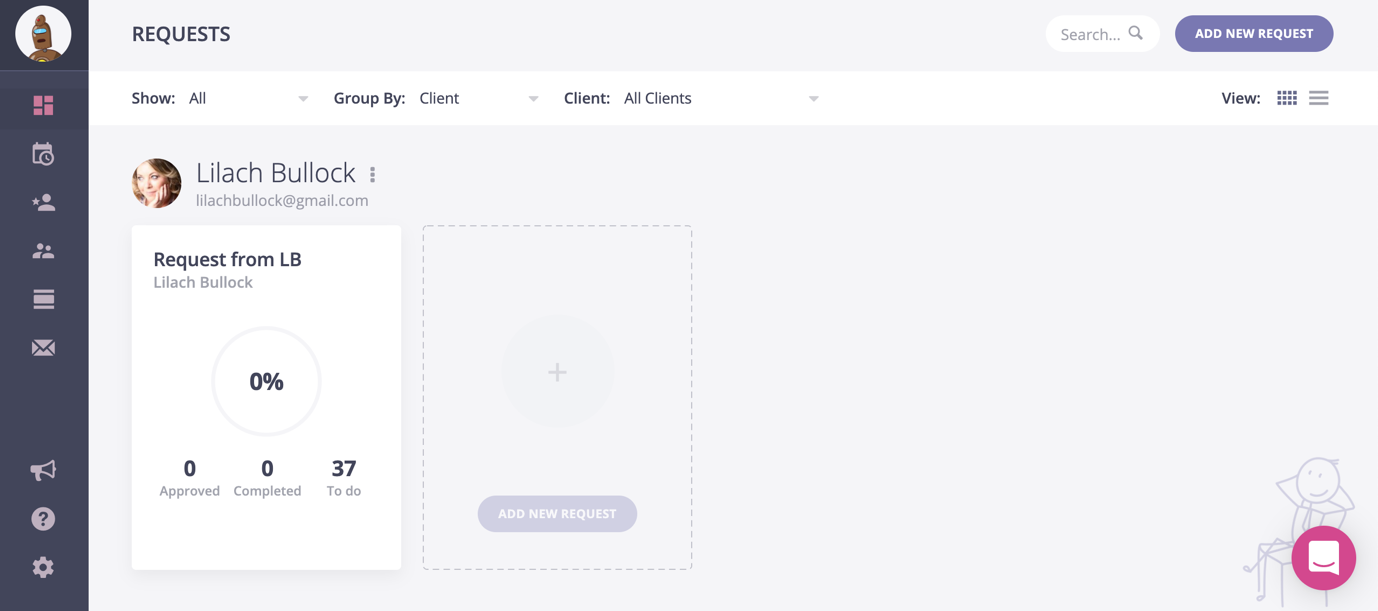
You can group them by clients as well, to keep things as organized as possible and easily find the requests you’re looking for.
Plus, you can also see your requests schedule at a glance, by using the built-in calendar where all of your requests will be automatically added as you publish them:
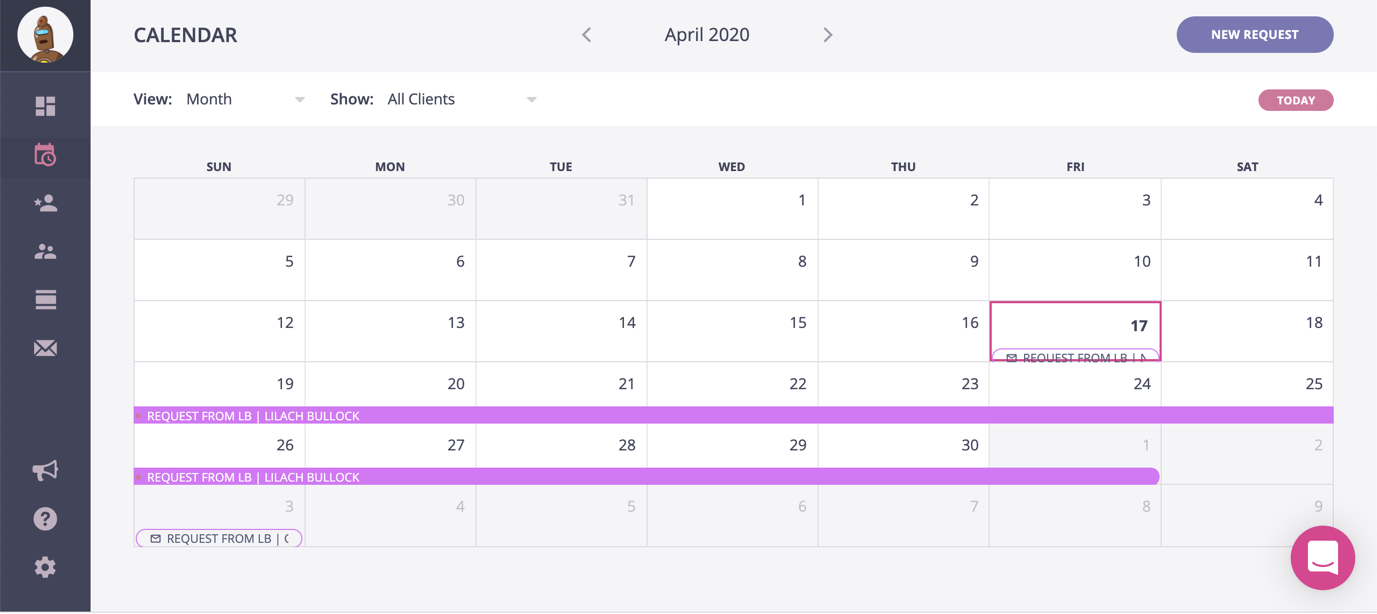
Another very cool feature is that you can set up reminder schedules and fully customize them, exactly as you need them; there’s already the Default Reminder schedule (the one that I showed you a bit earlier) which you can customize here, or you can create a completely new reminder schedule:
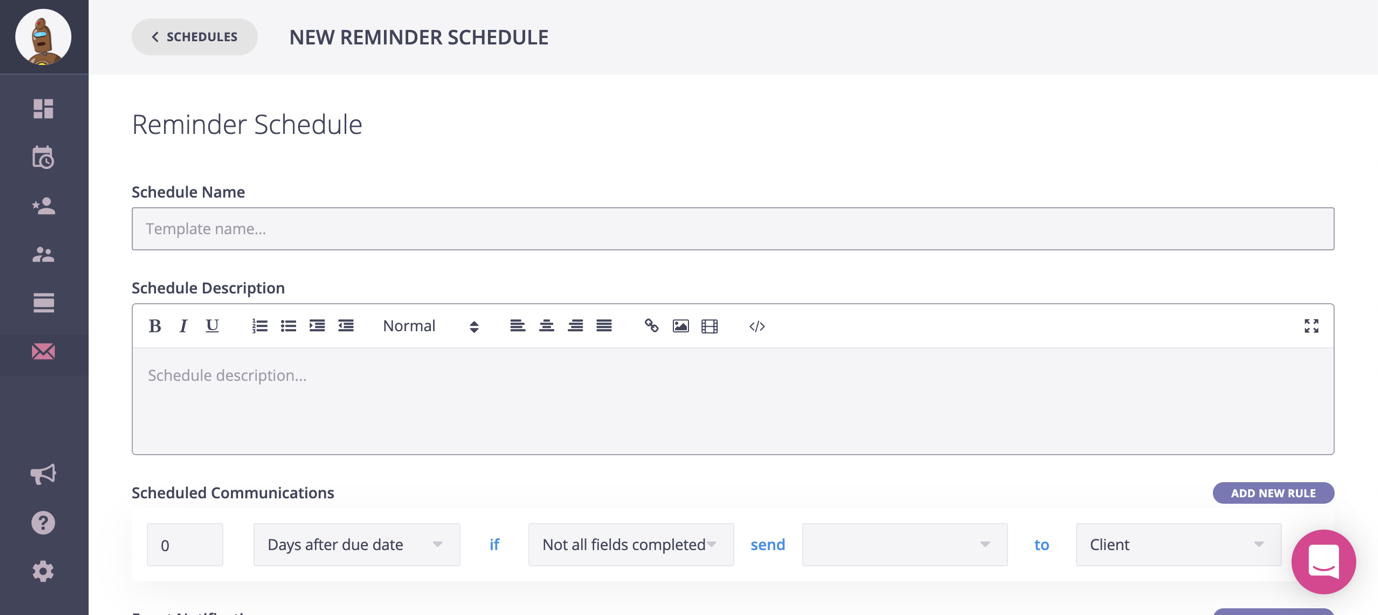
Basically, this is so you can schedule notifications to send to your clients to get them to complete the information you need from them, as well as send you any content or files needed, on time; the best part is that you can create automation rules to send notifications exactly when you want to, based on your clients’ actions:
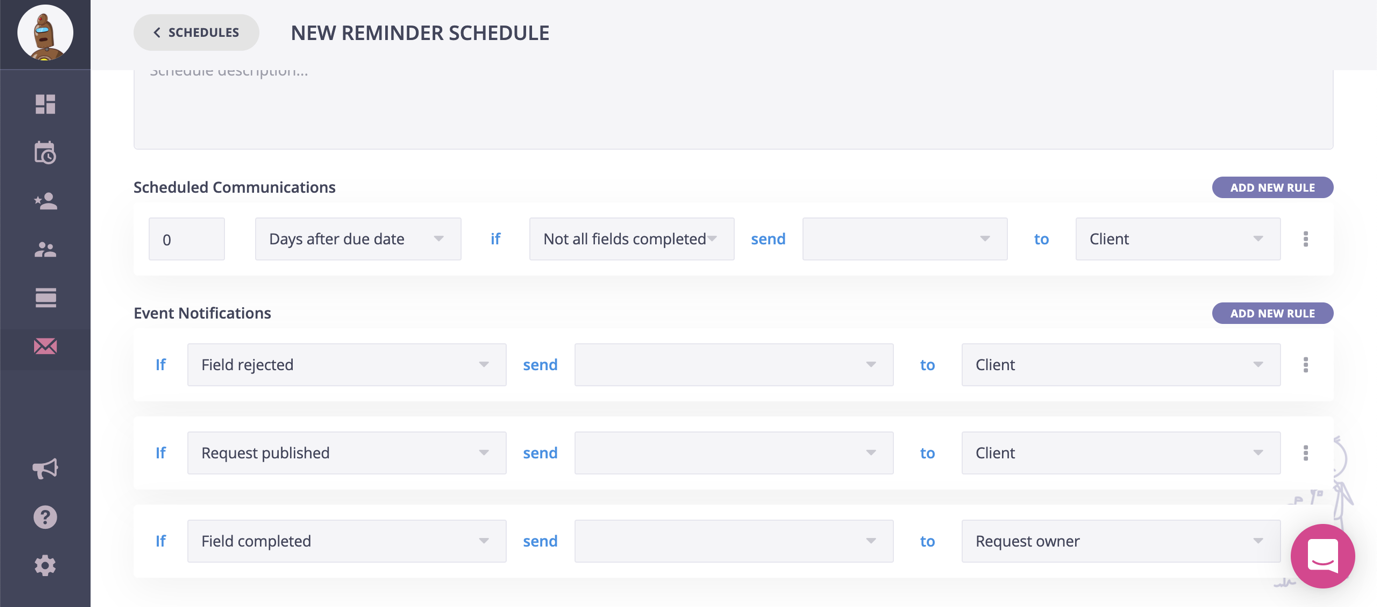
So for example, if a client hasn’t completed all the fields and the due date is about to come up in 2 days, you can send them an automatic notification; it’s completely up to you how you customize your reminder schedule but the main idea is to use it to save time with follow-ups and ensure that you get all the content and information you need from clients, on time.
And that’s pretty much it – once you’ve set up a few of your own templates as well, this will massively improve your productivity: there will be no more manual follow-ups, dozens of long email threads (did I ever mention how much I hate those long Gmail threads that are impossible to search through?)
Finally, Content Snare also works with Zapier! That means you can create workflows to send requests to your clients automatically. If you’re not familiar with Zapier, check out the Content Snare founder’s Zapier tutorial.
Conclusion
Client communication doesn’t have to be complicated and time-consuming; by using tools like Content Snare, you can make things much easier on yourself, as well as on your clients. Not to mention, you’ll look much more professional by handling your client communications this way.
So, stop wasting all this time managing your requests the hard way – via email – and save time and be more efficient by leveraging ContentSnare instead. You’ll save time, increase your profitability, and impress your clients, all at the same time.

Follow Lilach


